
x
Fingerstick glucose meters help you track daily blood sugar changes, but readings, errors, and long‑term supply costs can be confusing. This guide explains how to use and retest with strips and lancets, check meter accuracy, compare starter kits, and understand typical insurance coverage.
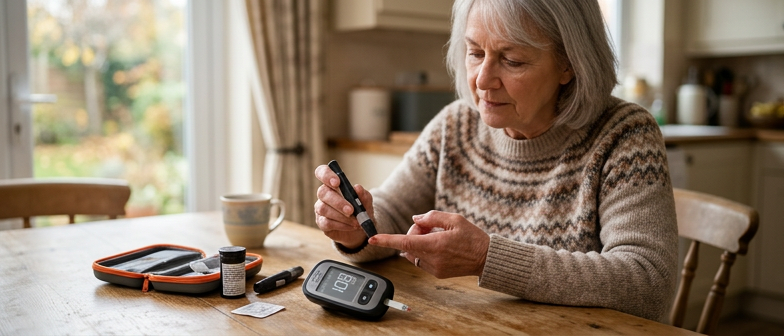
A blood glucose meter for finger testing is a small handheld device that uses a drop of blood from a fingertip to estimate the glucose level in the bloodstream at that moment. After the finger is pricked with a lancet, a small drop of blood is applied to a test strip that is inserted or already positioned in the meter, and a result appears within seconds. Home fingerstick meters allow people to monitor how meals, physical activity, illness, and medicines influence their glucose levels between clinic visits, instead of relying only on occasional laboratory testing.
Fingerstick meters are most often used by people with diabetes who have been advised to check blood sugar regularly, including those using insulin, certain oral drugs, or adjusting their treatment plan. Health professionals may compare a home reading with a laboratory test to better understand patterns and decide on care. In many areas, community health events or local clinics also offer finger-prick glucose screening for nearby residents as a quick check to identify possible issues and recommend follow-up, with results interpreted and confirmed by qualified clinicians.
Before checking your blood sugar, wash and dry your hands to remove anything that could affect the reading. Insert the correct test strip fully into the glucose meter, following the device manual. Load a new lancet into the lancing device and set the depth just high enough to get a small blood drop. Use the side of a fingertip rather than the center to reduce discomfort while still getting enough blood when using a meter with strips and lancets.
When the meter shows it is ready, hold the strip so the correct end faces the blood drop. Most strips have a small opening or edge where blood should be applied, as shown in the instructions. Prick the side of your finger, then gently squeeze from base to tip until a round drop forms. Bring the tip or channel of the strip to the drop and let the blood be drawn in until the meter confirms there is enough, instead of smearing it on top.
If an error appears or you notice there was not enough blood on the strip, discard the strip and lancet and repeat with a fresh set. Do not try to add more blood to a strip that has already started a reading. When retesting after a strip error, wash and dry your hands again, choose a slightly different site, and warm your hand if needed. If errors persist or results seem inconsistent with how you feel, review the device manual, check the strip expiration date, and consider asking a healthcare professional to review your technique or the meter.
Most errors with a blood glucose meter for finger testing come from how the strip and blood drop are handled. Wash and dry your hands, use an unexpired strip, and insert it fully before lancing. Apply blood only to the sample edge or tip as shown in the instructions and let the strip draw the drop in. If the meter reports not enough blood, do not use that value for treatment.
After a strip error, discard the strip, check the meter and vial for dirt or moisture, and prepare a new strip. Use a different spot on the same finger or another finger, allow a fresh hanging drop to form, then touch it to the sample area until the meter signals it has enough blood. If errors continue, ask a healthcare professional or the manufacturer to review your technique.
To judge whether a blood glucose meter for finger testing is reliable, start with correct technique. Wash and dry your hands before every test so food or lotion does not affect the result. Use the meter’s control solution when you open a new vial of strips, after physical damage to the device, or when a reading looks unusual. If the control value falls within the range printed on the strip container, the meter and strips are likely working properly; if it is outside that range, repeat the check and contact the manufacturer or a clinic for help.
You can also compare your meter reading with a laboratory blood test. Bring the meter to a scheduled lab visit and test a fingertip within a few minutes of the blood draw. Record both results, along with the time and whether you were fasting or had recently eaten. Laboratory systems measure plasma glucose and home meters use their own calibration, so the numbers will not match exactly, but they should be reasonably close once you consider timing and recent food or insulin.
A modest difference between home and lab results is expected, especially at higher glucose levels. Many guidelines consider it acceptable if the meter value is within about 15 percent of the laboratory result, but your clinician should interpret targets for your situation. If you often see large gaps or readings that do not match how you feel, review your lancing method, strip storage and expiration dates, and discuss these patterns with a health care professional to decide whether you need replacement equipment or further troubleshooting.
| Accuracy Check Method | Best Use Case | Practical Steps | Limitations |
|---|---|---|---|
| Control solution test | Suspected device or strip issue | Use control solution and compare to strip range | Does not reflect your actual blood glucose |
| Repeat finger test | Unexpected single high or low reading | Wash hands, use new strip, retest same finger or hand | Repeated user errors can still affect results |
| Compare with lab result | Periodic validation of meter performance | Test finger near time of lab draw and note conditions | Timing and recent food can cause differences |
| Technique review | Frequent readings that feel inaccurate | Check hand washing, lancing depth, strip handling | May not identify internal meter malfunction |
| Professional consultation | Ongoing large gaps or safety concerns | Share home and lab readings with clinician | Meter replacement decisions depend on clinical judgment |
When comparing glucose testing starter kits, start with how the meter fits your routine and comfort. Check that the display is easy to read, the controls are simple, and the prompts clearly show when and where to apply blood on the strip. Consider whether it stores readings with date and time or offers connectivity, and review any instructions for handling issues such as not having enough blood or seeing an error message.
Then review what comes with the kit. Confirm that test strips and lancets work with the meter and lancing device, and note how many supplies are included so you can estimate when refills will be needed. Some kits offer basic guidance on checking accuracy, such as comparing a home reading with a lab result or repeating a test after a strip error using the manufacturer’s steps.
For people using a blood glucose meter for finger testing, insurance often helps with the cost, but the details depend on the specific plan. Meters, test strips, and lancets may be treated as durable medical equipment or as pharmacy benefits, with different rules and cost sharing. Coverage is usually tied to a prescription and documented need for glucose monitoring, and plans may favor certain brands or basic models. Some policies include a low cost meter while applying copays or deductibles to everyday supplies, so it is important to check current terms with your insurer or pharmacy.
The number of strips covered is usually linked to how often your clinician recommends testing and whether you use insulin or need frequent checks. Many plans set a monthly allowance and may require prior authorization for higher amounts, leaving you to pay full price if you exceed the limit. Without insurance, a basic meter is often less expensive than the ongoing purchase of strips and lancets, so people who pay out of pocket may compare pharmacy prices or consider lower cost alternatives to manage regular expenses.
Over time, the cost of supplies for finger stick monitoring usually far exceeds the one time meter purchase. Ongoing spending includes strips, lancets, and occasional replacement of worn parts or control solution if used. What you pay depends on how often you test, which products are on your plan’s formulary, and whether deductibles, coinsurance, or copays apply. To plan realistically, many people review their testing schedule with a clinician, look at their insurance benefits, and request price information from pharmacies before deciding what to use.
| User scenario | Insurance coverage for meter and supplies | Out‑of‑pocket pattern | Cost management tips |
|---|---|---|---|
| Insured, low‑frequency tester | Meter often covered, limited strips allowed | Occasional copays, low monthly spending | Confirm strip allowance, use preferred brands |
| Insured, high‑frequency tester | Coverage may require prior authorization | Extra strips paid fully when over limits | Review testing schedule, ask about higher limits |
| Uninsured, new to finger testing | No plan coverage for meter or strips | One‑time meter cost, supplies feel expensive | Compare starter kits, ask pharmacies about budget options |
| Uninsured, long‑term frequent tester | No coverage for ongoing supplies | Supplies become largest recurring expense | Track usage, seek lower cost strips and lancets |
| High deductible plan user | Covered but paid mostly out of pocket until deductible | Higher costs early in the year, then lower | Check deductible status, group refills when reasonable |
What does a blood glucose meter for finger testing measure?
It analyzes a small drop of capillary blood from your fingertip to estimate your current blood sugar level for daily management decisions.
How should I apply blood on the test strip?
After pricking the side of your fingertip and forming a small drop, lightly touch it to the strip’s sampling edge and let the strip draw the blood in.
What if the meter shows a strip error or not enough blood?
Do not rely on that result. Discard the strip, wash and dry your hands, insert a new strip, obtain a fresh drop of blood, and repeat the test as directed.
How can I check whether my meter is accurate?
Use control solution with a new vial of strips or when a reading seems unusual, and see whether the result falls within the range printed on the strip container.
Does insurance cover glucose meters and test strips?
Many plans help pay for a basic meter and some ongoing strips and lancets, but brands, quantities, and copays vary, so you need to confirm details with your insurer or pharmacy.