
x
If you’re weighing a home solar panel installation, you’re likely worried about incentives, permits, roof condition, costs, and what happens if the system doesn’t work right away. This guide walks through key planning decisions, price breakdowns, installer selection, and basic troubleshooting.
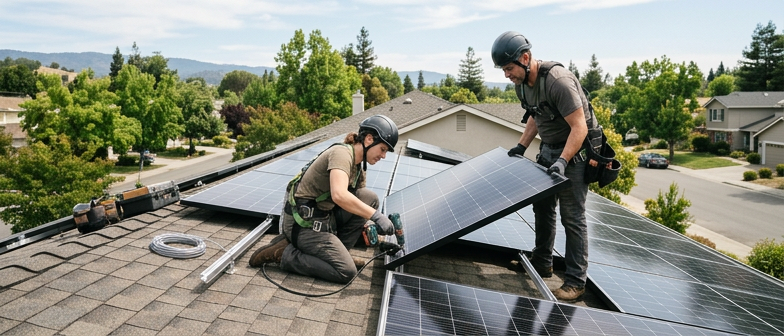
Planning a home solar panel installation starts with confirming whether your property is suitable. Installers typically review roof size, orientation, and shading to estimate potential sunlight. They also examine roof condition and remaining lifespan, because mounting equipment penetrates the roof surface and performs best on a stable structure. Some homeowners choose to replace an aging roof before panels are added to avoid future removal and reinstallation costs. At this stage you do not need a detailed design, but having recent electric bills, basic roof information, and any homeowner association or local zoning rules ready allows a contractor to outline what a solar project might look like for your household.
Once your home appears to be a good candidate, installation is scheduled as one step in a broader project. Typical milestones include site evaluation, system design, permit applications, utility review, physical installation, inspections, and final activation. You can begin by researching licensed contractors and comparing experience, workmanship warranties, and whether they manage permitting and inspections directly. Neutral business directories, recommendations from neighbors who already use solar, and state licensing or consumer protection resources can help you identify nearby companies. Recognizing that the visible work on your roof is only part of the process makes it easier to set expectations about paperwork, timelines, and when the system is likely to start producing electricity.
Before solar panels can be installed, most local authorities require a permit to confirm the design meets building, fire, and electrical codes. Installers usually prepare the plans and submit them to the city or county, often online. Review time depends on local rules and system complexity, ranging from a few days to several weeks, and may be longer during busy periods or if revisions are requested. Asking the installer or permitting office about typical timelines in your area is the most practical way to estimate how long approval may take.
After construction, local inspectors verify that the installation matches the approved plans and is wired safely. Passing inspection confirms code compliance but does not automatically allow full operation. The utility still has to review the interconnection application to ensure the system can safely send power to the grid. Until written permission to operate is granted, the system may stay off or run only in a limited test mode, so a newly inspected system may appear to produce little or no energy at first.
Once the utility issues permission to operate, the system can be switched on fully, the inverter should start converting power, and the monitoring app normally begins showing data. If the system has passed inspection but is not producing, or if the inverter remains off or monitoring shows no data, common causes include a utility lockout still in place, a breaker left open, incomplete monitoring setup, or internet connectivity problems. Reviewing the permission to operate document and contacting the installer or utility helps distinguish normal waiting periods from technical issues that require troubleshooting.
| Process Step | Main Goal | Common Delay Points | What Homeowners Should Watch For |
|---|---|---|---|
| Permit review by city or county | Confirm design meets safety codes | Backlog, requested plan revisions | Unclear review timeline, missing documents |
| On-site inspection after install | Verify installation matches approved plans | Scheduling inspector visit | Assuming passing inspection means full operation |
| Utility interconnection review | Ensure safe grid connection and metering | Administrative queue, extra utility requirements | No written permission to operate, utility lockout still in place |
| System turn-on and inverter startup | Begin converting solar power for use | Breaker left open, inverter not configured | Inverter status lights off, no apparent production |
| Monitoring app setup and data flow | Provide visibility into system performance | Account setup issues, internet problems | App not showing data, confusion between normal delay and faults |
A system can pass inspection but not produce yet if the utility still needs to install a meter or grant permission to operate. When the array appears inactive, check that the main solar disconnect and breaker are on, and that the inverter lights or screen show a normal status rather than an error. Refer to the installer’s handover notes on expected start‑up timing, and take clear photos of labels, the inverter display, and the electrical panel so a qualified electrician or the installation company can review them.
If the inverter reports a fault or the monitoring app shows no data, first confirm that home internet and Wi‑Fi are working, the monitoring gateway has power, and you are using the correct account. Some systems only send data after permission to operate is granted, while others store information locally. Write down the time and any error messages, avoid repeated resets without guidance, and contact the installer or a licensed electrician with a concise description of the symptoms.
When reviewing a solar installation cost breakdown, incentives often determine whether a project fits a household budget. A key benefit in the United States is the federal residential clean energy tax credit, which can reduce federal income tax owed based on eligible costs such as panels, inverters, mounting hardware and certain labor. To qualify, you generally need to own the system rather than lease it, use the property as a residence, and have enough tax liability to claim the credit. The Internal Revenue Service publishes the official rules, forms and definitions, and those sources are the reference for how the credit applies to a specific installation. Beyond the federal credit, some states, utilities and local governments offer rebates, bill credits or property tax rules with their own eligibility dates, equipment requirements and customer categories, so available incentives vary by location.
To understand your personal eligibility for solar incentives, start with federal guidance and read how your home ownership, filing status and planned system characteristics match the current definitions for residential projects, and consider asking a tax professional to interpret how those rules apply to your situation. Then, check official state and utility program databases for your area, looking closely at limits on system size, application deadlines, interconnection rules and whether certain equipment types or income ranges receive priority. When comparing proposals from installers, focus on how they present incentive estimates. A cautious quote usually separates the base installation price from any potential tax credits or rebates and notes that these benefits depend on program rules and approval. Treat incentives as possible reductions verified through primary sources instead of automatic discounts so that your decision about going solar is based on a realistic view of costs and benefits.
To see if you qualify for solar incentives, use official, frequently updated sources instead of sales material or general articles. For federal tax credits, review the latest Internal Revenue Service guidance on eligibility, qualified expenses, and filing steps. For state and local rebates, bill credits, or property tax changes, check recognized incentive databases and your state energy or utility commission sites, which describe program rules, limits, and how to apply. Local permitting and inspection offices can explain how incentives relate to permits or documentation. Because policies change and differ by location, always confirm current dates, criteria, and required forms directly with these authorities before making major solar spending decisions.
A home solar installation price typically combines equipment, labor, permitting, and company overhead. Panels, inverters, and mounting hardware are the main hardware costs, while wiring and safety devices add a smaller share. Design work, permit fees, inspections, and administrative tasks are often grouped as soft costs. Reviewing a cost breakdown that separates hardware from services helps you understand how much you pay for physical components versus the work required to design, approve, and safely connect the system.
Labor covers several specialized roles, including electricians for wiring and interconnection, roof crews for racking and panels, and project staff for permits and inspections. Labor charges depend on roof layout, system size, local wages, and time on site. A simple, single story roof with clear access usually requires less labor than a steep, complex, or shaded roof that needs additional structural or safety measures. Knowing how labor is priced allows you to ask which tasks are included, what conditions could extend work time, and when change orders might apply.
When comparing solar quotes, look beyond the headline price and check that system size, panel and inverter models, and assumptions about your electricity use are similar. Ask for a clear breakdown of equipment, labor, permits, and ongoing services, such as monitoring or maintenance. Review warranty coverage for parts, labor, and power output, and note production estimates and any stated performance assumptions. It is also useful to consider each installer’s familiarity with local building codes and utility rules so you can judge overall value and long term reliability.
How can I tell if my home is a good fit for solar panels?
You generally need a roof with enough sun, minimal shading, and solid structure with several years of life left. Have recent power bills and any HOA or zoning rules ready, then ask a solar installer to assess the site.
Am I eligible for incentives on a home solar system?
Most programs require that you own the system and use it at a qualifying residence, and you must meet tax and program rules. Check current IRS guidance for federal credits and your state or utility websites for local requirements.
How long does a typical residential solar permit take?
Approval time varies by city, workload, and system details. It may range from a few days to several weeks. Ask your installer and local permitting office about current review times and how often revisions are requested.
Should I replace my roof before adding solar panels?
If your roof is aging or has damage, replacing it first is usually cheaper than removing and reinstalling panels later. A roofer and solar installer can estimate remaining roof life and how mounting hardware will affect it.
What if my solar inverter is not working right after install?
Check that the solar disconnect and breakers are on and review the inverter display for error codes. Take clear photos and contact the installation company or a qualified electrician to confirm commissioning steps and address faults.