
x
Trying to decide if a checkerboard bathroom floor will really work in your space and budget? This guide compares stone vs porcelain, pricing, layout starting points, subfloor leveling, and when to DIY or hire a nearby tile installer so the pattern looks sharp and lasts.
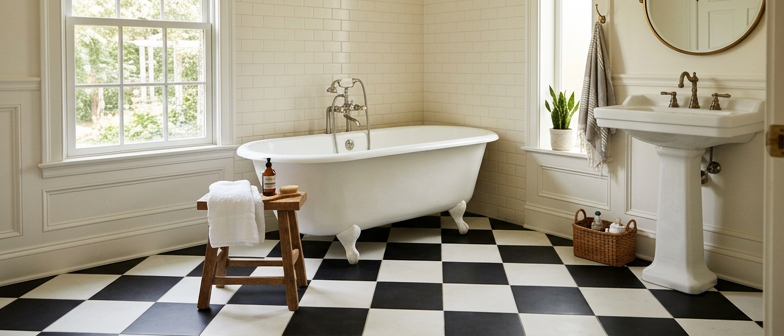
Checkerboard bathroom floor tile ideas work well because the alternating squares play with scale, light, and proportion. The pattern naturally pulls your eye across the room, helping a small bath feel wider and a large one feel more structured. High‑contrast black and white adds crisp energy, while the simple grid keeps the room feeling ordered, even with lots of fixtures and storage. The mix of light and dark tiles also hides everyday dust and splashes better than a solid floor, so the space looks cleaner between deep scrubs.
Beyond floors, ceramic checkerboard tile for bathroom walls can repeat the grid as a feature wall or accent band, tying the room together without overwhelming it. Using softer neutrals, warm grays, or tone‑on‑tone squares creates a calmer, spa‑like version that still feels graphic. Because this pattern is just a clean grid, it suits traditional baths with claw‑foot tubs as easily as sleek modern spaces, and pairs with both natural stone looks and glossy porcelain for a timeless result.
When you plan a checkerboard bathroom, your first big decision is natural stone vs porcelain bathroom tile, because that choice affects both the look and how the surface handles moisture. Marble or limestone gives a soft, upscale feel and unique veining, but these stones are porous, need sealing, and can etch or stain if you use harsh cleaners. Porcelain is manufactured to be dense, stain resistant, and very low in water absorption, so a black and white grid in porcelain is usually easier to maintain and better suited to busy, wet bathrooms. People who want a classic checkerboard with minimal upkeep usually choose porcelain, while those who prioritize luxury and do not mind a maintenance routine often lean toward natural stone.
Ceramic is another option when you want the checkerboard pattern on bathroom walls instead of the main floor. Using ceramic checkerboard tile for bathroom walls creates a coordinated look in areas that do not see standing water, and wall rated ceramic is typically lighter and easier to cut. If the checkerboard design continues into a walk in shower, always check the shower tile water absorption rating and look for products labeled impervious or very low absorption. These tiles better handle splashing and steam and help limit moisture getting behind the surface, especially when used on shower floors where a slip resistant finish is also important.
Peel and stick products add a budget friendly route to checkerboard bathroom floor tile ideas, especially in rentals or for quick refreshes. However, you should compare peel and stick bathroom tiles carefully with porcelain, ceramic, and stone before using them in very wet zones. Peel and stick bathroom wall tile can work for accents above a vanity or on a half wall, where splashes are limited and you can prep the surface so the adhesive bonds well. Most peel and stick tiles are not designed for shower interiors or constantly wet floors, so it is safer to keep them in low splash areas and rely on properly rated traditional tile wherever the checkerboard pattern will face pooling water and long term humidity.
| Material Option | Durability & Water Handling | Maintenance & Care | Slip & Safety in Wet Areas | Best Checkerboard Use |
|---|---|---|---|---|
| Natural stone (marble, limestone) | Moderate, more moisture sensitive | High maintenance, needs sealing | Can be smooth, add textured pieces | Luxury floors, low to moderate splash zones |
| Porcelain tile | High, very low absorption | Low maintenance, stain resistant | Good options with textured finishes | Busy bathroom floors and shower areas |
| Ceramic wall tile | Moderate, not for standing water | Low to moderate upkeep | Typically not rated for wet floors | Checkerboard walls and light splash zones |
| Peel and stick tiles | Low in constant moisture | Easy to clean, adhesive sensitive | Not ideal for wet, slick floors | Accent walls, vanity backsplashes, rentals |
For a checkerboard bathroom floor, the main factor in the price per square foot is the tile material. Basic ceramic or standard porcelain usually keep costs down, while premium porcelain and natural stone sit higher. Installers also tend to charge more for a checker pattern than for a simple grid because of extra layout time, precise cuts, and added waste, so a typical bathroom checkerboard floor installation estimate often lands toward the upper end of standard bathroom tile pricing even with budget materials.
Pattern complexity also shifts your budget within checkerboard designs. A simple two color layout set square to the walls is usually the most economical, while diagonal patterns, borders, or mixed tile sizes raise labor time and wasted tile. Larger pieces reduce grout lines but make any mistake more expensive to fix, which some pros factor into their rates. When you request an installation estimate, expect quotes to reflect both square footage and how intricate the layout will be.
Before you buy materials, decide how bold you want your checkerboard bathroom floor to look by choosing tile size and orientation. Larger tiles feel quieter and more modern, while smaller squares create a classic pattern that stands out in a compact bathroom. To establish your checkerboard tile layout starting point, measure the room and snap chalk lines through the center in both directions, then dry-lay a few rows along those lines to see where full tiles and cuts will fall at the tub, vanity, and doorway. Adjust the layout so you avoid thin, awkward slivers at the edges that make the pattern look crooked or unfinished.
How you begin the layout is as important as the pattern itself. When you test-fit tiles, keep focal points in mind, such as the entry or the view from the hallway, and try to center the pattern there so the alternating colors look intentional. Shift the starting lines if needed so tiles frame the toilet base and floor vents cleanly instead of leaving tiny pie-shaped cuts. Mark your final layout with clear reference lines and arrows for tile direction so you can follow the same pattern once adhesive is down and working time is limited.
A straight, crisp checkerboard pattern depends on a flat, solid surface, so understanding how to level a bathroom tile subfloor is essential. Check for movement, squeaks, and flex in the existing floor, tightening or reinforcing the structure so grout will not crack later. Use a long level to find dips or high spots, then sand down ridges and fill low areas with patching compound or a self-leveling underlayment, following the manufacturer’s spread rate and drying times. Once the subfloor is smooth, clean, and dry, your layout lines stay true and the tiles sit evenly, avoiding lippage and helping the finished floor look professionally installed.
Many checkerboard bathroom floor tile ideas fail because the layout starts in a random corner instead of the room’s center or the main sightline from the door. If you simply follow crooked walls, the pattern creeps and tiles look wider on one side. Before spreading adhesive, dry‑lay rows, snap chalk lines from your chosen starting point, and correct any misalignment while it is easy to adjust.
Another frequent mistake is perfecting the pattern while ignoring moisture problems in the floor. Skipping bathroom tile moisture damage repair means laying a precise checkerboard over a soft, swollen, or uneven subfloor. That damaged base can loosen tiles, crack grout, and distort those crisp lines over time, so always investigate discoloration or flexing, fix water issues, and flatten the surface first.
Laying a checkerboard bathroom floor looks simple in photos, but the high‑contrast pattern exposes every mistake. A DIY job requires precise measuring, perfectly square layout lines, and choosing a starting point that keeps the checkerboard centered instead of cramped along the walls. You also need to know how to level a bathroom tile subfloor so dips or humps do not throw off grout lines. If you already have tiling experience, a wet saw, and feel confident cutting around toilets and vanities and handling basic waterproofing, doing it yourself can cut labor costs, but it demands patience and meticulous work.
Hiring a professional checkerboard tile installer near you is smarter when the room has odd angles, a sloped shower floor, or any signs of past water issues. A pro can check the structure, handle bathroom tile moisture damage repair before tiling, and choose mortars and membranes that prevent future leaks. They use layout tricks to keep the pattern straight and center the design, reducing the odds of cracked tiles, lippage, or an expensive tear‑out and redo later.
Why do checkerboard bathroom floor tiles look good in small spaces?
The contrast squares lead your eye across the room, which makes it feel wider and hides light dust and splashes.
How does natural stone compare with porcelain for a checkerboard bathroom floor?
Stone like marble looks high‑end but is porous, needs sealing, and can stain or etch. Porcelain absorbs less water and is usually easier to keep up in wet, busy baths.
What mainly affects the price per square foot for a checkerboard tile floor?
Material cost is key: basic ceramic and standard porcelain are cheaper, while premium porcelain and stone run more. Labor also goes up because the pattern needs careful layout and cuts.
Where should I start laying checkerboard tile so the pattern feels balanced?
Mark the room center with perpendicular chalk lines, then dry‑lay tiles to see cuts at the tub, vanity, and doorway. Adjust slightly to avoid thin edge pieces.
Do I need to level the bathroom subfloor before a checkerboard installation?
Yes. Dips or humps make grout lines wander and the pattern look crooked. Use a straightedge to find uneven spots and fill lows with leveling compound first.